Color.module allows the admin to change the color scheme of a theme completely. By selecting a palette of 5 colors (either from a set or by hand), you can change the colors of an entire theme.
The module can alter the stylesheet and re-render images. However, the theme must provide specific hooks to allow this, and the design must be created specifically to accomodate this.
This document explains the basics of making a colorizable theme.
Design
 It is important to realize that due to the way color.module works, not every design can be colorized.
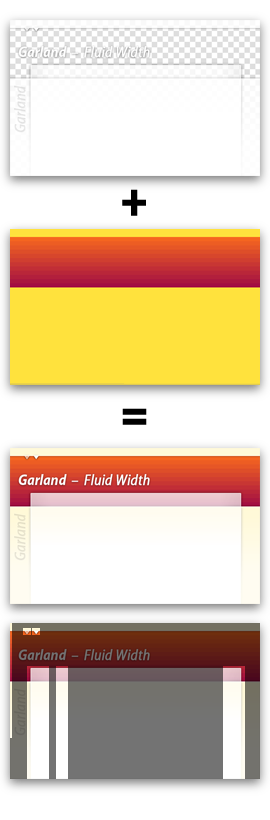
We take a transparent image of the design (the base), which includes everything except the background. We then compose this image on top of a colored background, to get the colored versions. Finally we slice up this composite image into smaller images and save them to separate image files.
We also process the stylesheet and change all the colors based on the ones you defined. The module smoothly changes the colors using the palette as a reference. Colors that don't appear literally in the palette are adjusted relative to the closest matching palette color (whether it is a link, text or background color).
So, the photoshop mockup of the design should consist of a layered file that has one or more colored layers at the bottom of the layer stack, with everything else blended on top. When you save the base image, you have to merge all layers together, while keeping the colored layers invisible. Take a look at Garland's base.png file to see an example (open it in an image editor to see the transparencies). There is a video showing how to create your own base.png file using Photoshop.
All the files generated in this process are written to /files/css and used instead of the default images. This means that a colorizable theme should still work out of the box without color.module, in the default color scheme.
In Practice
Let's use Garland as an example. The most important files are in the themes/garland/color subdirectory:
- base.png
- This contains the base design of the theme, which is composed and sliced into the images.
- color.inc
- This file contains all the necessary parameters to color the theme. See below.
- preview.css
- This stylesheet is used to generate the preview on the color changer.
- preview.png
- This image is used to generate the preview on the color changer.
The presence of color/color.inc makes the color picker appear on the theme's settings. It is a regular PHP file which contains an $info array with the following values:
Schemes
<?php
	array('schemes' => array(
	    '#0072b9,#027ac6,#2385c2,#5ab5ee,#494949' => t('Blue Lagoon (Default)'),
	    '#464849,#2f416f,#2a2b2d,#5d6779,#494949' => t('Ash'),
	    '#55c0e2,#000000,#085360,#007e94,#696969' => t('Aquamarine'),
	    '#d5b048,#6c420e,#331900,#971702,#494949' => t('Belgian Chocolate'),
	    '#3f3f3f,#336699,#6598cb,#6598cb,#000000' => t('Bluemarine'),
	    '#d0cb9a,#917803,#efde01,#e6fb2d,#494949' => t('Citrus Blast'),
	    '#0f005c,#434f8c,#4d91ff,#1a1575,#000000' => t('Cold Day'),
	    '#c9c497,#0c7a00,#03961e,#7be000,#494949' => t('Greenbeam'),
	    '#ffe23d,#a9290a,#fc6d1d,#a30f42,#494949' => t('Mediterrano'),
	    '#788597,#3f728d,#a9adbc,#d4d4d4,#707070' => t('Mercury'),
	    '#5b5fa9,#5b5faa,#0a2352,#9fa8d5,#494949' => t('Nocturnal'),
	    '#7db323,#6a9915,#b5d52a,#7db323,#191a19' => t('Olivia'),
	    '#12020b,#1b1a13,#f391c6,#f41063,#898080' => t('Pink Plastic'),
	    '#b7a0ba,#c70000,#a1443a,#f21107,#515d52' => t('Shiny Tomato'),
	    '#18583d,#1b5f42,#34775a,#52bf90,#2d2d2d' => t('Teal Top'),
	  ));
	?>
This entry contains a straightforward array of pre-defined color schemes. Each entry must have 5 colors (which, in order, are base color, link color, top header, bottom header, and text color) formatted as above, and a title.
The first scheme is used as a reference and must match the colors used in the theme's default images and stylesheet closely. Otherwise, the final colors might not be what the user intended. See the 'stylesheets' section for more information about how the colors are calculated.
Images to copy
<?php
	  array('copy' => array(
	    'images/menu-collapsed.gif',
	    'images/menu-expanded.gif',
	    'images/menu-leaf.gif',
	  ));
	?>
This array contains a list of images which should not be altered. They are copied to the location of the generated images and stylesheet.
Fill areas and Gradients
To color the image, we create a target image that is the same size as the base image, and draw colored areas and a gradient. For full flexibility, the location of these areas is defined by specifying their coordinates using (x, y, width, height):
<?php
	  array('gradient' => array(0, 37, 760, 121));
	?>
You can specify one vertical two-color gradient.
<?php
	  array('fill' => array(
	    'base' => array(0, 0, 760, 568),
	    'link' => array(107, 533, 41, 23),
	  ));
	?>
You can specify regions for each of the palette colors. The region will be filled in with the selected color. Available colors are 'base', 'link', 'top', 'bottom' and 'text'.
Image slices
Next, you need to define the areas of the base image to slice out for each of the images. Again, you specify coordinates as (x, y, width, height) along with the filename of the image, as used in the stylesheet. The logo and screenshot slices are special and always take the same filename. The screenshot will be resized to 150x90 pixels.
<?php
	  array('slices' => array(
	    'images/body.png'                      => array(0, 37, 1, 280),
	    'images/bg-bar.png'                    => array(202, 530, 76, 14),
	    'images/bg-bar-white.png'              => array(202, 506, 76, 14),
	    'images/bg-tab.png'                    => array(107, 533, 41, 23),
	    'images/bg-navigation.png'             => array(0, 0, 7, 37),
	    'images/bg-content-left.png'           => array(40, 117, 50, 352),
	    'images/bg-content-right.png'          => array(510, 117, 50, 352),
	    'images/bg-content.png'                => array(299, 117, 7, 200),
	    'images/bg-navigation-item.png'        => array(32, 37, 17, 12),
	    'images/bg-navigation-item-hover.png'  => array(54, 37, 17, 12),
	    'images/gradient-inner.png'            => array(646, 307, 112, 42),

	    'logo.png'                             => array(622, 51, 64, 73),
	    'screenshot.png'                       => array(0, 37, 400, 240),
	  ));
	?>
Files
Finally you need to specify the location of the files for your theme. You need an image and a stylesheet for the preview, as well as the base image*:
<?php
	array(
	  'preview_image' => 'color/preview.png',
	  'preview_css' => 'color/preview.css',
	  'base_image' => 'color/base.png',
	);
	?>
* As of drupal 6, Color.module will no longer require base_image, meaning it is possible to utilize the module without images.
Stylesheets
The color.module will read in a theme's style.css file as well as any other styles that are imported with @import statements and create a new style.css file. It will change the colors in the CSS using one of the chosen palette colors as a reference, depending on the context:
- Links: the 'link' color is used, for rules that apply to
aelements. - Text: the 'text' color is used, for rules that appear in
color:styles. - Base: the 'base' color is used for everything else.
However, if a color in the stylesheet matches one of the reference colors exactly, the context will be ignored, and the matching replacement color will be used instead.
 For example, suppose your reference color is dark blue by default, but you change it to red. Your default stylesheet contains both light blue and gray purple, both relative to this reference color.
The resulting colors (mauve and brown) are similarly different from red as the original colors were from blue. In technical terms: the relative difference in hue, saturation and luminance is preserved.
If you find color.module is using the wrong reference color, try separating the different pieces into separate CSS rules, each in their own selector { ... } section, so there is no confusion about the context.
Note that if you edit your stylesheet after changing the color scheme, you must resubmit the color scheme to regenerate the color-shifted version.
If you wish for certain colors in the stylesheet not to be altered, you should place their CSS below the following marker:
/*******************************************************************
	* Color Module: Don't touch                                       *
	*******************************************************************/
You can only use this marker once in your style.css file. It applies globally, so if you use it inside an imported stylesheet, all colors below the @import statement will be left alone too.
Making colors match
It is important that the generated images match with the shifted colors in the generated stylesheet. Otherwise, ugly edges might appear.
To make this work, pixels in the base image must all be a simple color in areas where they have to match with CSS-defined colors. Because we don't know where CSS-defined colors appear in the base image, we use a global blending color which must be the same in the whole design. Garland uses white. Note that the Garland base does include e.g. gray and black pixels, but only in areas where only images are used as backgrounds (e.g. the header). Other than white, black or grey are good candidates too.
<?php
	  array('blend_target' => '#ffffff');
	?>
Masochists can take a peek at color.module's innards, particularly the _color_shift() function if you're interested in the how and why of this.
PHPTemplate changes
Finally, you need to hook color.module into your theme. We'll use a PHPTemplate theme as an example, but this applies to other engines as well.
In your theme's template.php file, add the following snippet (for Drupal 6.x):
<?php
	/**
	* Override or insert PHPTemplate variables into the templates.
	*/
	function phptemplate_preprocess_page(&$vars) {
	  // Hook into color.module
	  if (module_exists('color')) {
	    _color_page_alter($vars);
	  }
	}
	?>
In Drupal 5.x, you’ll need to add the following snippet:
<?php
	/**
	* Override or insert PHPTemplate variables into the templates.
	*/
	function _phptemplate_variables($hook, $vars) {
	  if ($hook == 'page') {

	    // Hook into color.module
	    if (module_exists('color')) {
	      _color_page_alter($vars);
	    }
	    return $vars;
	  }
	  return array();
	}
	?>
This will allow the module to override your theme's logo, stylesheet and screenshot. If you perform other changes in _phptemplate_variables, you need to merge in this snippet.