一个field通常是Drupal中的一个成分,用来存储一个值,记录用户登录或一个模块建立。字段的信息在数据库中校验、存储,可以从数据库中抽取并显示在网站上。字段的例子包括用户名、街道地址、电话号码、价格、一个或两个描述事件的段落、一个日期或其他任何你想象的信息片段。
在Drupal 7中,建立字段有了人人瞩目的改变——Field API加到了核心里。过去为了校验、存储、抽取、显示字段层信息而定义表、写代码是个乏味冗长的任务,现在处理这些通过一个Field API集合。许多字段层特性都加入了Drupal7的核心,来自Drupal6的CCK模块,CCK模块提供一个UI层接口来在Drupal先前版本建立字段。
在本章中,我将展示标准的建立到Drupal7核心的类CCK功能,怎样通过增加一个新的字段类型来扩展功能,任何一个站点管理员都可以讲这个新的字段类型附加到内容类型中,最后展示怎样在一个模块中用Field API通过几个不同的字段类型来建立一个新的内容类型。
创建内容类型
Drupal有个杀手级应用,就是可以创建自定义内容类型,自定义内容类型被定义为创建一个节点的框架,内容类型典型地包含一些字段,最少一个title字段、一个body字段和几个其它用来获取结构化信息的字段。例如一个event自定义内容类型,event有一些字段来获取、存储、显示信息,诸如事件名字、事件描述(body)、事件的日期和时间、事件的位置。让我们通过后台来建立一个新的event内容类型:Structure->Content Type点击Add content type连接。建立一个新的内容类型相对简单——输入内容类型要呈现的名称的值(此例中是Event)几个简短的描述,以及可选的覆盖Event节点标题的标签,此例中我们将标签从Title改到Event Title(见图8-1)。
 Figure 8-1. Main page for creating a content type
伴随“Submission form settings”值定义完,下一步是修改发布选项去给你的站点的请求加地址。点击“Publishing options”选项卡来check/uncheck选项,我们不选“Promoted to front page”选项,默认是选择。
在“Display settings”表单,我们不选择在Event显示时是否显示作者信息。我们不需要看见是谁发布的事件。
“Comment settings”表单控制一个内容类型的评论如何显示,在Evenet这个情况,不需要评论,我们设置“Default comment setting for new content”为Hidden。
在“menu settings”表单,我们将“Main Menu”复选框选掉,不在页面上显示。
随着内容类型的大部分配置选项的设置,我现在已经准备好保存Event内容类型并且进行到处理流程的下一步——增加字段(见图8-2)。在你点击“Save and add fields”按钮后,Drupal带你到这个页面,在此你可以为Event内容类型增加新的字段。
Figure 8-1. Main page for creating a content type
伴随“Submission form settings”值定义完,下一步是修改发布选项去给你的站点的请求加地址。点击“Publishing options”选项卡来check/uncheck选项,我们不选“Promoted to front page”选项,默认是选择。
在“Display settings”表单,我们不选择在Event显示时是否显示作者信息。我们不需要看见是谁发布的事件。
“Comment settings”表单控制一个内容类型的评论如何显示,在Evenet这个情况,不需要评论,我们设置“Default comment setting for new content”为Hidden。
在“menu settings”表单,我们将“Main Menu”复选框选掉,不在页面上显示。
随着内容类型的大部分配置选项的设置,我现在已经准备好保存Event内容类型并且进行到处理流程的下一步——增加字段(见图8-2)。在你点击“Save and add fields”按钮后,Drupal带你到这个页面,在此你可以为Event内容类型增加新的字段。
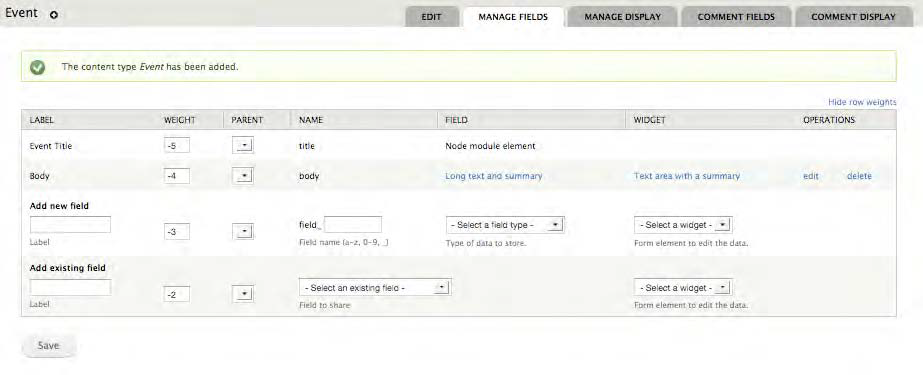 Figure 8-2. The page for adding fields
在增加字段之前,我们要确定事件时间是否用纯文本形式,还是用作者建立事件时可用的弹出式日历形式,在大多数情况下,你可能想最后做这些,就像日期通常有其它的使用目的,像确定在日历上哪里放置一个内容项目、以用户所在地的格式来格式化日期或进行日期计算。Date模块(http://drupal.org/project/date)提供一个可以在我们的Event内容类型中使用的字段,它可以弹出一个日历让你选择日期。那么,在我们增加字段处理之前,按标准安装方式安装Date模块。
Figure 8-2. The page for adding fields
在增加字段之前,我们要确定事件时间是否用纯文本形式,还是用作者建立事件时可用的弹出式日历形式,在大多数情况下,你可能想最后做这些,就像日期通常有其它的使用目的,像确定在日历上哪里放置一个内容项目、以用户所在地的格式来格式化日期或进行日期计算。Date模块(http://drupal.org/project/date)提供一个可以在我们的Event内容类型中使用的字段,它可以弹出一个日历让你选择日期。那么,在我们增加字段处理之前,按标准安装方式安装Date模块。
为一个内容类型增加字段
两个为Event内容类型增加的字段是事件的定位和事件的日期/时间。我们从定位字段开始,在标签那输入Event Location,字段名称那里输入event_location,我们选择“text field”组件来作为这个字段的存储的数据类型(如图8-3)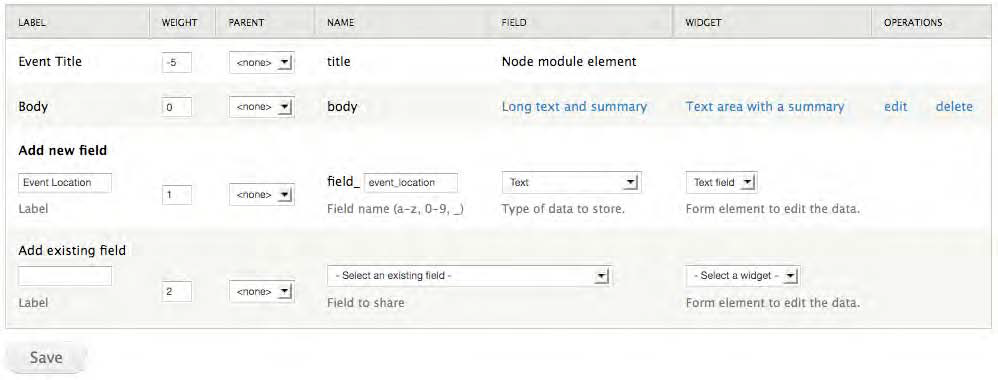 Figure 8-3. Adding the Event Location field to the Event content type
点击Save按钮来时事件定位字段的文本字段的长度设定出现,我们保留默认值255个字节,然后点击“Save field settings”按钮,下一个表单(图8-4)显示事件定位字段配置选项的细节。
下一个值的设置允许你去覆写我们用图8-3输入的标签的值,通过点击选中为必须域,意味着作者建立新的事件时必须在这个字段输入值,设置文本字段的物理长度,就是显示在屏幕上的长度,是否作者有权限改变输入过滤,帮助文本将显示在输入字段的下方,默认值是当在屏幕上渲染这个表单时分配给该字段的值。
Figure 8-3. Adding the Event Location field to the Event content type
点击Save按钮来时事件定位字段的文本字段的长度设定出现,我们保留默认值255个字节,然后点击“Save field settings”按钮,下一个表单(图8-4)显示事件定位字段配置选项的细节。
下一个值的设置允许你去覆写我们用图8-3输入的标签的值,通过点击选中为必须域,意味着作者建立新的事件时必须在这个字段输入值,设置文本字段的物理长度,就是显示在屏幕上的长度,是否作者有权限改变输入过滤,帮助文本将显示在输入字段的下方,默认值是当在屏幕上渲染这个表单时分配给该字段的值。
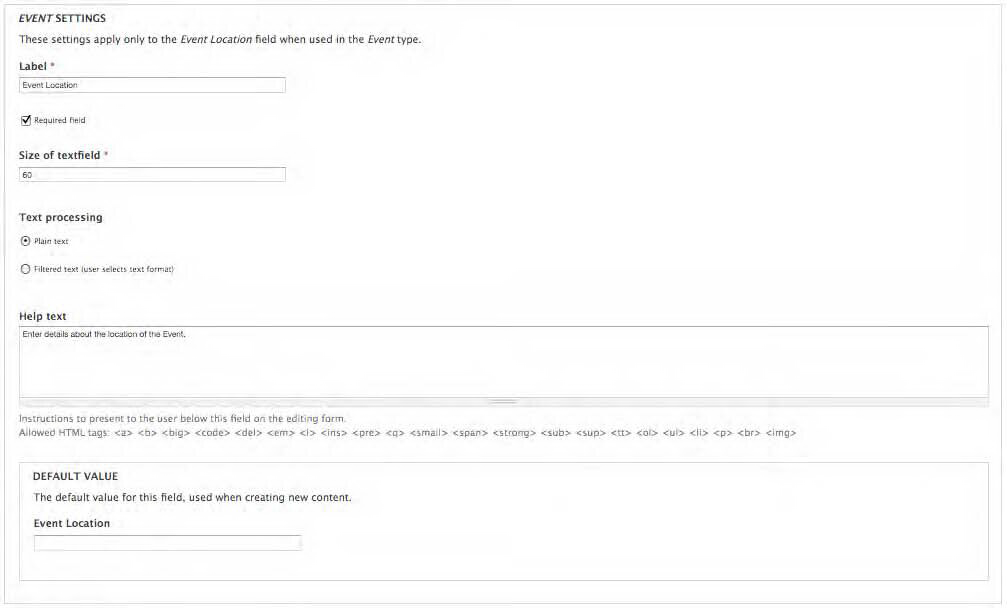 Figure 8-4. Field settings for the Event Location field
最后设置的值是字段值的数量或基数以及事件定位字段能输入的最大字符数(见图8-5),我们保留默认值为1,就是事件只能有一个定位,并且我保留可输入最大长度为255个字符,点击“Save Settings”按钮返回如图8-3事件定位字段增加到字段列表的表单。
Figure 8-4. Field settings for the Event Location field
最后设置的值是字段值的数量或基数以及事件定位字段能输入的最大字符数(见图8-5),我们保留默认值为1,就是事件只能有一个定位,并且我保留可输入最大长度为255个字符,点击“Save Settings”按钮返回如图8-3事件定位字段增加到字段列表的表单。
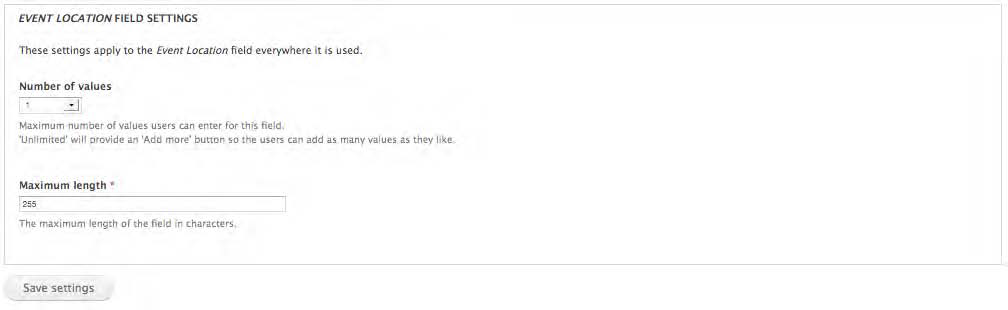 Figure 8-5. Setting the cardinality and maximum number of characters for the field
下一步是增加Event日期字段。我将使用同建立Event Location字段一样的处理程序。将Event Date and Time作为标签,字段名为event_date_time,选择Datetime作为数据存储类型,选择带有弹出式日历的Text Field作为在屏幕上显示的样式,点击Save按钮引出date字段的字段设置页面,如图8-6,除了“Time zone handling”我们都使用默认值,我们将“Time zone handling”设置为“No time zone conversion”,由作者输入的时间就是我想在站点上显示的时间。
Figure 8-5. Setting the cardinality and maximum number of characters for the field
下一步是增加Event日期字段。我将使用同建立Event Location字段一样的处理程序。将Event Date and Time作为标签,字段名为event_date_time,选择Datetime作为数据存储类型,选择带有弹出式日历的Text Field作为在屏幕上显示的样式,点击Save按钮引出date字段的字段设置页面,如图8-6,除了“Time zone handling”我们都使用默认值,我们将“Time zone handling”设置为“No time zone conversion”,由作者输入的时间就是我想在站点上显示的时间。
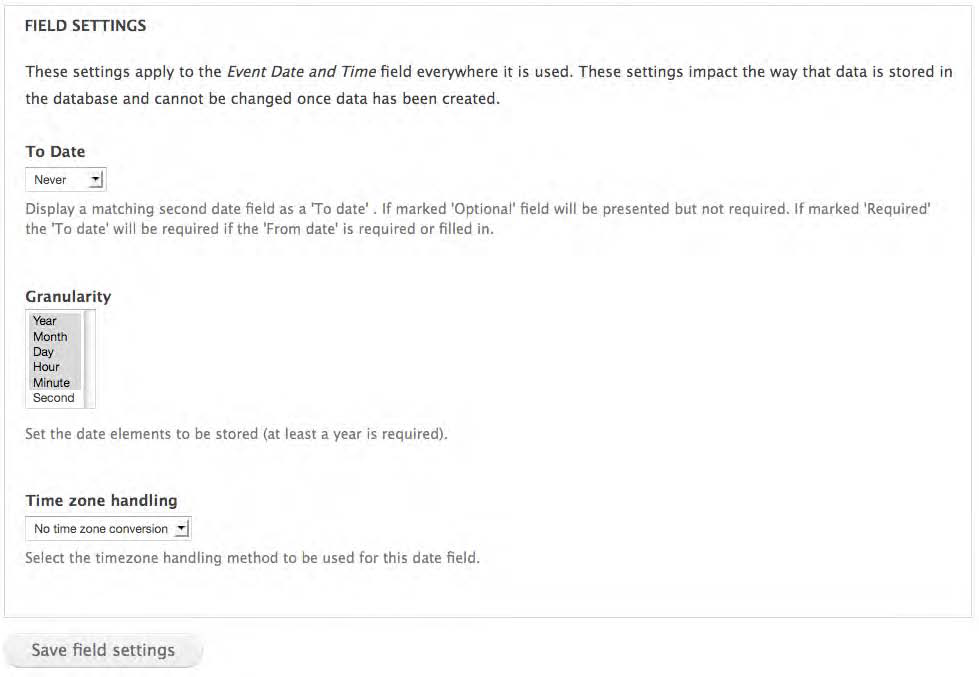 Figure 8-6. The Field Settings page for the Event Date and Time field
然后你点击“Save field settings”按钮,Event设置页面显示出来以设置日期字段,在这个页面上,我可以覆写我先前输入的标签,选择此字段是否是必须(日期和时间在我的站点上是事件必须的),帮助文本将显示在此字段的饿下面,默认显示的是在日期模块中设置的日期格式,如果作者没有选择一个值,则使用默认值,输入格式定义在输入表单中日期的输入顺序和格式,前面的年份和后面的年份将显示在弹出日历中,以及分钟的递增值(事件发生间隔一小时、半小时、一刻钟,你将这个值分别改成60,30或15),你也有能力去设置你能建立的值的数量——我们只需要调用一个值,来确定起止时间,就是日期和时间的间隔尺度,你还可以覆写Drupal是否可以转换输入的时间,当它基于不同的选项显示的时候。
对于Event日期,我将保留所有的值为默认值,然后点击“Save settings”按钮,现在我有了Event内容类型所有的字段,并且开始授权Events使用节点创建表单,如图8-7。
Figure 8-6. The Field Settings page for the Event Date and Time field
然后你点击“Save field settings”按钮,Event设置页面显示出来以设置日期字段,在这个页面上,我可以覆写我先前输入的标签,选择此字段是否是必须(日期和时间在我的站点上是事件必须的),帮助文本将显示在此字段的饿下面,默认显示的是在日期模块中设置的日期格式,如果作者没有选择一个值,则使用默认值,输入格式定义在输入表单中日期的输入顺序和格式,前面的年份和后面的年份将显示在弹出日历中,以及分钟的递增值(事件发生间隔一小时、半小时、一刻钟,你将这个值分别改成60,30或15),你也有能力去设置你能建立的值的数量——我们只需要调用一个值,来确定起止时间,就是日期和时间的间隔尺度,你还可以覆写Drupal是否可以转换输入的时间,当它基于不同的选项显示的时候。
对于Event日期,我将保留所有的值为默认值,然后点击“Save settings”按钮,现在我有了Event内容类型所有的字段,并且开始授权Events使用节点创建表单,如图8-7。
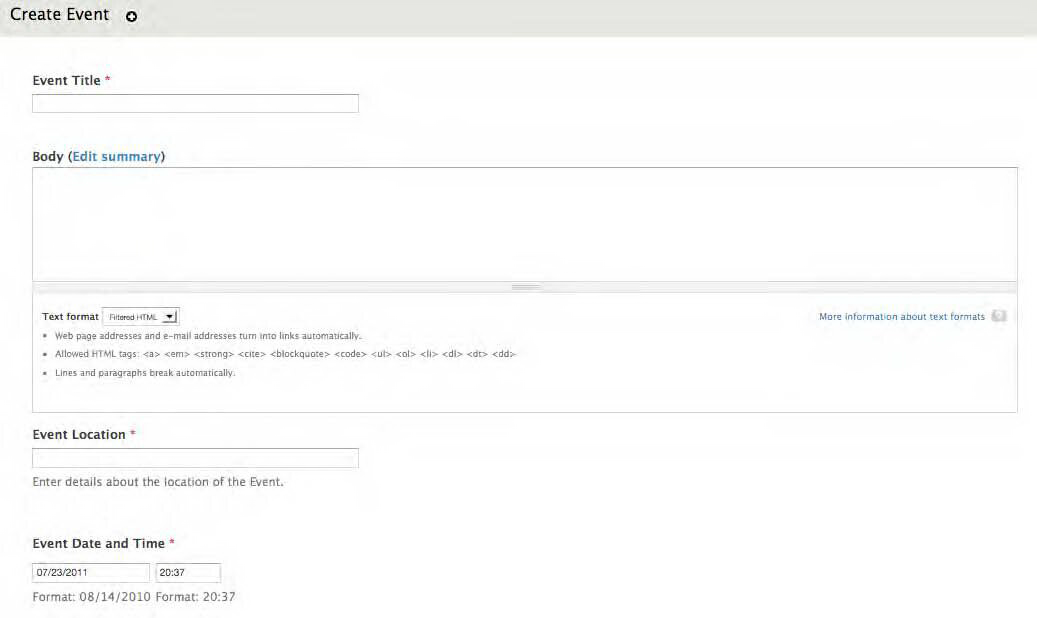 Figure 8-7. Creating a new Event
注意:在本书写成时,Date模块通过修订直接加到Drupal核心,我建议你查看http://drupal.org/project/date来看看配置一个日期字段的途径或表单的更新。
Figure 8-7. Creating a new Event
注意:在本书写成时,Date模块通过修订直接加到Drupal核心,我建议你查看http://drupal.org/project/date来看看配置一个日期字段的途径或表单的更新。
创建一个自定义字段
Drupal7核心自带的几个通用字段类型能满足大多数不同的目的,你能用前面的字段类型为广大不同的目的去捕获、存储和显示值,但是,这有许多可能是标准的字段类型不是你需要的,这些可以使Field API起作用、激活自定义字段的建立,它用来在你的站点上建立任何的字段类型。 Table 8-1 . Standard Field Types in Drupal 7 Core ---------------------------------------------------------------------------------------------- field type usage ---------------------------------------------------------------------------------------------- Boolean 用于在复选框或单选框中收集真假值 Decimal 用于收集包含小数点的十进制数字 File 提供一个文件上传字段允许作者附加一个文件到你的 内容类型的一个实例 Image 提供一个图片上传字段允许作者附加一个图片到你的 内容类型的一个实例 Integer 提供一个文本字段使作者能在此输入一个整数 List 提供一个建立选择列表(弹出、或select值列表)的 List(numeric) 或复选框/单选框按钮使作者可以选择一个或多个预先 List(text) 提供的值 Long text 提供一个多行文本区使作者可以在此输入信息 Long text and summary Term 提供选择taxonomy term的能力 reference Text 一个简单的文本框 -------------------------------------------------------------------------------------------- 借助Field API,你有能力去构建一个自定义字段满足几乎任何类型的你能想到的数据输入。一个例子,我们将使用Drupal.org上的字段类型例子(http://api.drupal.org/api/drupal/developer--examples--color_example--color_example.module/7),它定义一个自定义字段,在字段类型设置字段时,将文本渲染成颜色。我们使用这个字段类型来捕获和显示事件参与者出席未来事件应该穿什么颜色。 第一步在sites/all/modules/custom中建立一个目录叫color_example,在此目录中建立新文件color_example.info,输入下面内容:name = Color Example description = "Create a custom field for inputting and displaying text in a colorful fashion" package = Pro Drupal Development core = 7.x files[] = color_example.module php = 5.2下一步建立其它文件名叫color_example.module,放入下面内容
/**

 * @file

 * An example field using the Field API

 *

 */
保存文件,激活这个模块。我们已经准备好构造新的RGB字段类型细节了。 第一步调用hook_field_info(),它定义我们的新字段的基本属性,我们定义字段为color_example_rgb()并且分配一个标签、描述、默认组件和默认格式到新的字段类型。
/**

 * Implements hook_field_info().

 *

 * Provides the description of the filed

 */

function color_example_field_info() {

  return array(

    'color_example_rgb' => array(

      'lable' => t('Example Color RGB'),

      'description' => t('Demonstrates a field composed of an RGB color.'),

      'default_widget' => 'color_example_3text',

      'default_formatter' => 'color_example_simple_text',

    ),

  );

}
下一步定义在此字段收集的数据怎样在Drupal数据库中存储,在D7和Field API之前,我们要在模块中自己定义表和图表来定义我们的内容类型和内容类型中用到的自定义字段,在D7中,利用Field API,这个任务由hook_field_schema()为我们处理,例如,我们存储一个用于在屏幕上渲染文本的描述HTMLhex颜色代码的7字符字段——例如使用#FF0000渲染红色文本。在此例中,我们建立一个单个的column存贮由站点管理员输入的RGB的值,假如他把这个字段分配给一个内容类型的话。
/**

 * Implements hook_field_schema().

 */

function color_example_field_schema($field) {

  $columns = array(

    'rgb' => array('type' => 'varchar', 'length' => 7, 'not null' => FALSE),

  );

  $indexes => array(

    'rgb' => array('rgb'),

  );

  return array(

    'columns' => $columns,

    'indexes' => $indexes,

  );

}
下一步是用hook_field_validate()校验用户的输入,我要告诉Drupal用户输入的值匹配一个典型HTML颜色代码模式,我将检视第一个字符是不是“#”并且下面跟随的是不是数字或一个在a-f之间的字符,如果输入的值不匹配这个模式,我将显示一个错误。
/**

 * Implements hook_field_validate().

 *

 * Verifies that the RGB field as combined is valid

 * (6 hex digits with a # at the beginning).

 */

function color_example_field_validate($entity_type, $entity, $field, $instance, $langcode, $items, &$errors) {

  foreach ($items as $delta => $item) {

    if (!empty($item['rgb'])) {

      if (!preg_match('@^#[0-9a-f]{6}$@', $item['rgb'])) {

        $errors[$field['field_name']][$langcode][$delta][] = array(

          'error' => 'color_exmple_invalid',

          'message' => t('Color must be in the HTML format #abcdef.'),

        );

      }

    }

  }

}
下一个函数定义什么构成了这个类型的空字段,在这种情况,我们使用PHP空函数返回TRUE或FALSE二者之一,这依赖于此字段是否为空。
/**

 * Implements hook_field_is_empty().

 */

function color_example_field_is_empty($item, $field) {

  return empty($item['rgb']);

}
1.字段格式器是一个函数,定义字段的内容是怎样显示的,钩子hook_field_formatter_info()函数标识格式器的类型,在我们的例子中她用于显示文本和背景。
/**

 * Implements hook_field_formatter_info().

 */

function color_example_filed_formatter_info() {

  return array(

    // this formatter just display the hex value in the color indicated.

    'color_example_simple_text' => array(

      'label' => t('Simple text-based formatter'),

      'field types' => array('color_example_rgb').

    ),

    // This formatter changes the background color of the content region.

    'color_example_color_background' => array(

      'lable' => t('Change the background of the output text'),

      'field types' => array('color_example_rgb'),

    ),

  );

}
下面我将为这两个格式器建立可渲染输出,两个格式器是这样定义的:
1. color_example_simple_text只输出标记指示颜色,此颜色是输入的并使用inline风格来设置文本颜色为此值。
2. color_example_color_background 作用相同但是改变div.region-content的背景颜色。
/**

 * Implements hook_field_formatter_view().

 */

function color_example_filed_formatter_view($entity_type, $entity, $field, $instance, $langcode, $items, $display) {

  $element = array();

  witch ($display['type']) {

    // This formatter simply output the field as text and with a color.

    case 'color_example_simple_text':

      foreach ($items as $delta => $item) {

        $element[$delta]['#markup'] = '<p style="color: ' . $item['rgb'] . '">' . t('The color for event is @code', array('@code' => $item['rgb'])) . '</p>';

      }

      break;

    // This formatter adds css to the page changing the '.region-content' area's

    // background color. If there are many fields, the last one will win.

    case 'color_exmple_color_background':

      foreach ($items as $delta => $item) {

        drupal_add_css('div.region-content { background-color:' . $item['rgb'] . ';}', array('type' => 'inline'));

        $element[$delta]['#markup'] = '<p>' . t('The color for this event has been changed to @code', array('@code' => $item['rgb'])) . '</p>';

      }

      break;

  }

  return $element;

}
下一个函数定义校验用户的输入数据
/**

 * Validate the individual fields and the convert them into a single HTML RGB

 * value as text.

 */

function color_example_text_validate($element, &$form_state) {

  $delta = $element['#delta'];

  $field = $form_state['field'][$element['#field_name']][$element['#language']]['field'];

  $field_name = $field['field_name'];

  if (isset($form_state['values'][$field_name][$element['#language']][$delta])) {

    $value = $form_state['values'][$field_name][$element['#language']][$delta];

    foreach (array('r', 'g', 'b') as $colorfield) {

      $val = hexdec($values[$colorfield]);

      // If they left any empty, we'll set the value empty and quit.

      if (strlen($values[$colorfield) == 0) {

        form_set_value($element, array('rgb' => NULL), $form_state);

        return;

      }

      // If they gave us anything that's not hex reject it.

      if ((strlen($values[$colorfield]) != 2) || $val <0 || val > 255) {

        form_error($element[$colorfield], t('Saturation value must be a 2-digit hex value between 00 and ff.'));

      }

    }

    $value = sprintf('#%02s%02s%02s', $values['r'], $values['g'], &values['b']);

    form_set_value($element, array('rgb' => $value), $form_state);

  }

}
最后,我用hook_field_error()来在用户输入无效时显示错误信息。
/**

 * Implements hook_field_error().

 */

function color_example_field_widget_error($element, $error, $form, $form_state) {

  switch ($error['error']) {

    case 'color_example_invalid':

      form_error($element, $error['message']);

      break;

  }

}
下一个文件是Javascript文件,提供一个farbtastic颜色选择器,在这个目录中建立color_example.js,包含下列代码:
/**

 * @file

 * Javascript for Color Example.

 */

/**

 * Provide a farbtastic colorpicker for the fancier widget.

 */

(function($) {

  Drupal.behaviors.color_example_colorpicker = {

    attach: function(context) {

      $(".edit-field-example-colorpicker").live("focus", function(event) {

        var edit_field = this;

        var picker = $(this).closest('tr').find(".field-example-colorpicker");

        // Hide all color picker except this one.

        $(".field-example-colorpicker").hide();

        $(picker).show();

        $.farbtastic(picker, function(color) {

          edit_field.value = color;

        }).setColor(edit_field.value);

      });

    }

  }

})(jQuery);
最后一个文件是本模块必须的CSS文件,建立一个叫color_example.css的新文件包含下面CSS代码:
/**

 * @file

 * CSS for Color Example

 */

div.form-item table .form-type-textfield,

div.form-item table .form-type-textfield * {

  display: inline-block;

}
保存完这个模块之后,字段已经准备好去加到一个内容类型里啦,通过Structure->Content Types来为Event增加color字段,点击Event内容类型的Manage Fields选项卡将展示如图8-8情形:
 Figure 8-8. Adding the new Event Color field
然后点击Save按钮,带到下一个字段设置页面,它给我们展示并没有任何一个字段设置分配给Event COlor字段(例如 maximum length),点击“Save setting”按钮到Event的可覆写设置页面(如图8-9)。在这个表单中,我将输入帮助文本,显示在表单的该字段下面,输入color字段的默认值,点击“Save Setting”完成Event节点编辑表单的增加字段处理流程。
Figure 8-8. Adding the new Event Color field
然后点击Save按钮,带到下一个字段设置页面,它给我们展示并没有任何一个字段设置分配给Event COlor字段(例如 maximum length),点击“Save setting”按钮到Event的可覆写设置页面(如图8-9)。在这个表单中,我将输入帮助文本,显示在表单的该字段下面,输入color字段的默认值,点击“Save Setting”完成Event节点编辑表单的增加字段处理流程。
 Figure 8-9. Setting the configuration options for the new Event Color field
随着字段增加到Event内容类型,我已经准备去测试它的输出。导航到Add Content->Event保留新的Event的RGB color字段的默认值(如图8-10)。
Figure 8-9. Setting the configuration options for the new Event Color field
随着字段增加到Event内容类型,我已经准备去测试它的输出。导航到Add Content->Event保留新的Event的RGB color字段的默认值(如图8-10)。
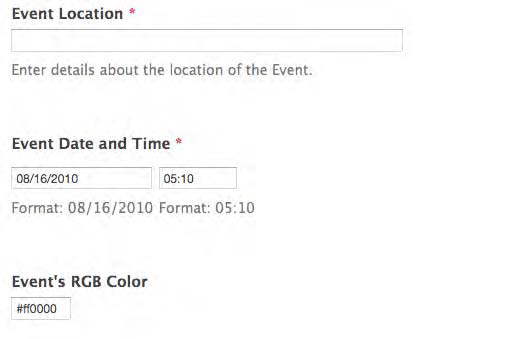 Figure 8-10. The new Event RGB Color field on the node edit form
然后保存Event,新的字段显示的格式如同定义在模块的格式器函数的那样,图8-11用节点建立时定义的颜色显示文本,这个例子中我输入的是红色。
Figure 8-10. The new Event RGB Color field on the node edit form
然后保存Event,新的字段显示的格式如同定义在模块的格式器函数的那样,图8-11用节点建立时定义的颜色显示文本,这个例子中我输入的是红色。
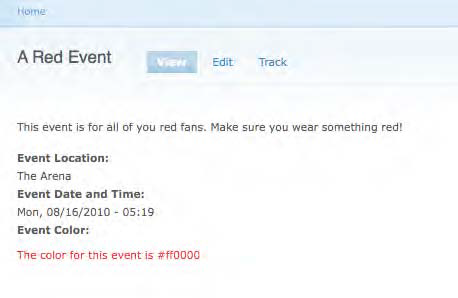 Figure 8-11. The new field is displayed in the color defined by the author.
目前为止,我展示了怎样使用标准的Drupal字段类型去建立一个新内容类型和怎样去建立一个能够加到内容类型的新字段类型,下面我将展示怎样在一个模块中使用Field API去程序化地增加一个字段。
Figure 8-11. The new field is displayed in the color defined by the author.
目前为止,我展示了怎样使用标准的Drupal字段类型去建立一个新内容类型和怎样去建立一个能够加到内容类型的新字段类型,下面我将展示怎样在一个模块中使用Field API去程序化地增加一个字段。
程序化增加字段
Field API能被用来程序化地增加字段到一个内容类型或节点类型,下面的例子演示使用Field API来增加一个新字段到一个由模块创建的内容类型。Job Post模块创建内容类型,它扩展自常规节点(title和body),增加了一个新的字段,用来存储和显示发布工作信息的公司的名称,增加字段的程序发生在模块的.install文件的hook_install()和hook_update()函数中。 在hook_install()函数中第一步是增加body字段到我们的新的Job Post内容类型,默认情况下,通过模块建立的内容类型只包含title字段,你必须隐含的增加body字段。node.module定义了一个名叫node_add_body_field()的函数,用它增加标准的body字段到我们的Job Post内容类型。下一步我将遍历的是增加所有要增加到Job Post内容类型中的字段定义,本例子的情况是,只有一个叫job_post_companies的字段需要增加,如果我想增加多个字段,我能通过在_job_post_installed_fields()函数中增加字段定义来完成。定义新字段简单的事情,给定一个名字、一个标签、和一个字段类型。建立字段的最后的步骤是使用field_create_instance()函数实例化字段,这个函数做完所有的幕后工作,诸如在数据库中创建存储机制来获取用户输入的值,当你看见这个情景,这里不需要再数据库中定义表——Field API为你做了所有的工作。在你安装模块后,这个字段就在你的节点编辑表单里啦,已准备好为你的模块使用。另外关于怎样使用和主题化自定义字段的输出请看第7章。<?php
/**
* @file
* Install file for Job Post module
*/
/**
* Implement hook_install().
*
* - Add the body field.
* - Configure the body field.
* - Create the company name field.
*/
function job_post_install() {
node_types_rebuild();
$types = node_type_types();
node_add_body_field($types['job_post']);
// Load the instance definition for our content type's body.
$body_instance = field_info_instance('node', 'body', 'job_post');
// Add our job_post_list view mode to the body instance display by.
$body_instance['type'] = 'text_summary_or_trimmed';
// Save our changes to the body field instance.
field_update_instance($body_instance);
// Create all the fields we are adding to our content type.
foreach (_job_post_installed_field() as $field) {
field_create_field($field);
}
// Create all the instances for our fields.
foreach (_job_post_installed_instances() as $instance) {
$instance['entity_type'] = 'node';
$instance['bundle'] = 'job_post';
field_create_instance($instance);
}
}
/**
* Return a structured array defining the fields create by this content type.
*/
function _job_post_installed_fields() {
$t = get_t();
return array(
'job_post_company' => array(
'field_name' => 'job_post_company',
'label' => $t('Company posting the job listing'),
'type' => 'text',
),
);
}
/**
* Return a structtured array defining the instances for this content type.
*/
function _job_post_installed_instances() {
$t = get_t();
return array(
'job_post_company' => array(
'field_name' => 'job_post_company',
'type' => 'text',
'label' => $t('Company posting the job listing'),
'widget' => array(
'type' => 'text_textfield',
),
'display' => array(
'job_post_list' => array(
'label' => $t('Company posting the job listing'),
'type' => text,
),
),
),
);
}
/**
* Implements hook_uninstall().
*/
function job_post_uninstall() {
// Gather all the example content that might have been created while this
// module was enable.
$sql = 'SELECT nid FROM {node} n WHERE n.type = :type';
$result = db_query($sql, array(':type' => 'job_post'));
$nids = array();
foreach ($result as $row) {
$nids[] = $row->nid;
}
// Delete all the nodes at once
node_delete_multiple($nids);
// Loop over each of the fields defined by this module and delete
// all instances of the field, their data, and the field itself.
foreach (array_keys(_job_post_installed_fields()) as $field) {
field_delete_field($field);
}
// Loop over any remaining field instances attached to the job_post
// content type (such as body field) and delete them individually.
$instances = field_info_instances('node', 'job_post');
foreach ($instances as $instance_name => $instance) {
field_delete_instance($instance);
}
// Delete our content type.
node_type_delete('job_post');
// Purge all field information
field_purge_batch(1000);
}